Charles Pears, PSMA, ROI British, 1873-1958
Named for one of the Hebridean Islands, Oronsay was the second of five identical sisters ordered for the Orient Line's premier Australian passenger service in a post-War rebuilding programme begun in the early 1920s. Laid down in John Brown's yards on the Clyde, she was launched on 14th August 1924 and completed for sea on 14th January 1925. Registered at 20,001 tons gross, she measured 659 feet in length with a 75 foot beam and had accommodation in two classes for about 1,850 passengers, Fitted with twin screws driven by geared turbines powered from oil-fired boilers, she was a handsome and well-appointed ship destined to prove very popular with the travelling public. Following successful sea trials in the Firth of Clyde, she left Tilbury on her maiden voyage to Brisbane on 7th February and thereafter maintained an unblemished regular service to Australia for the ensuing fourteen years.
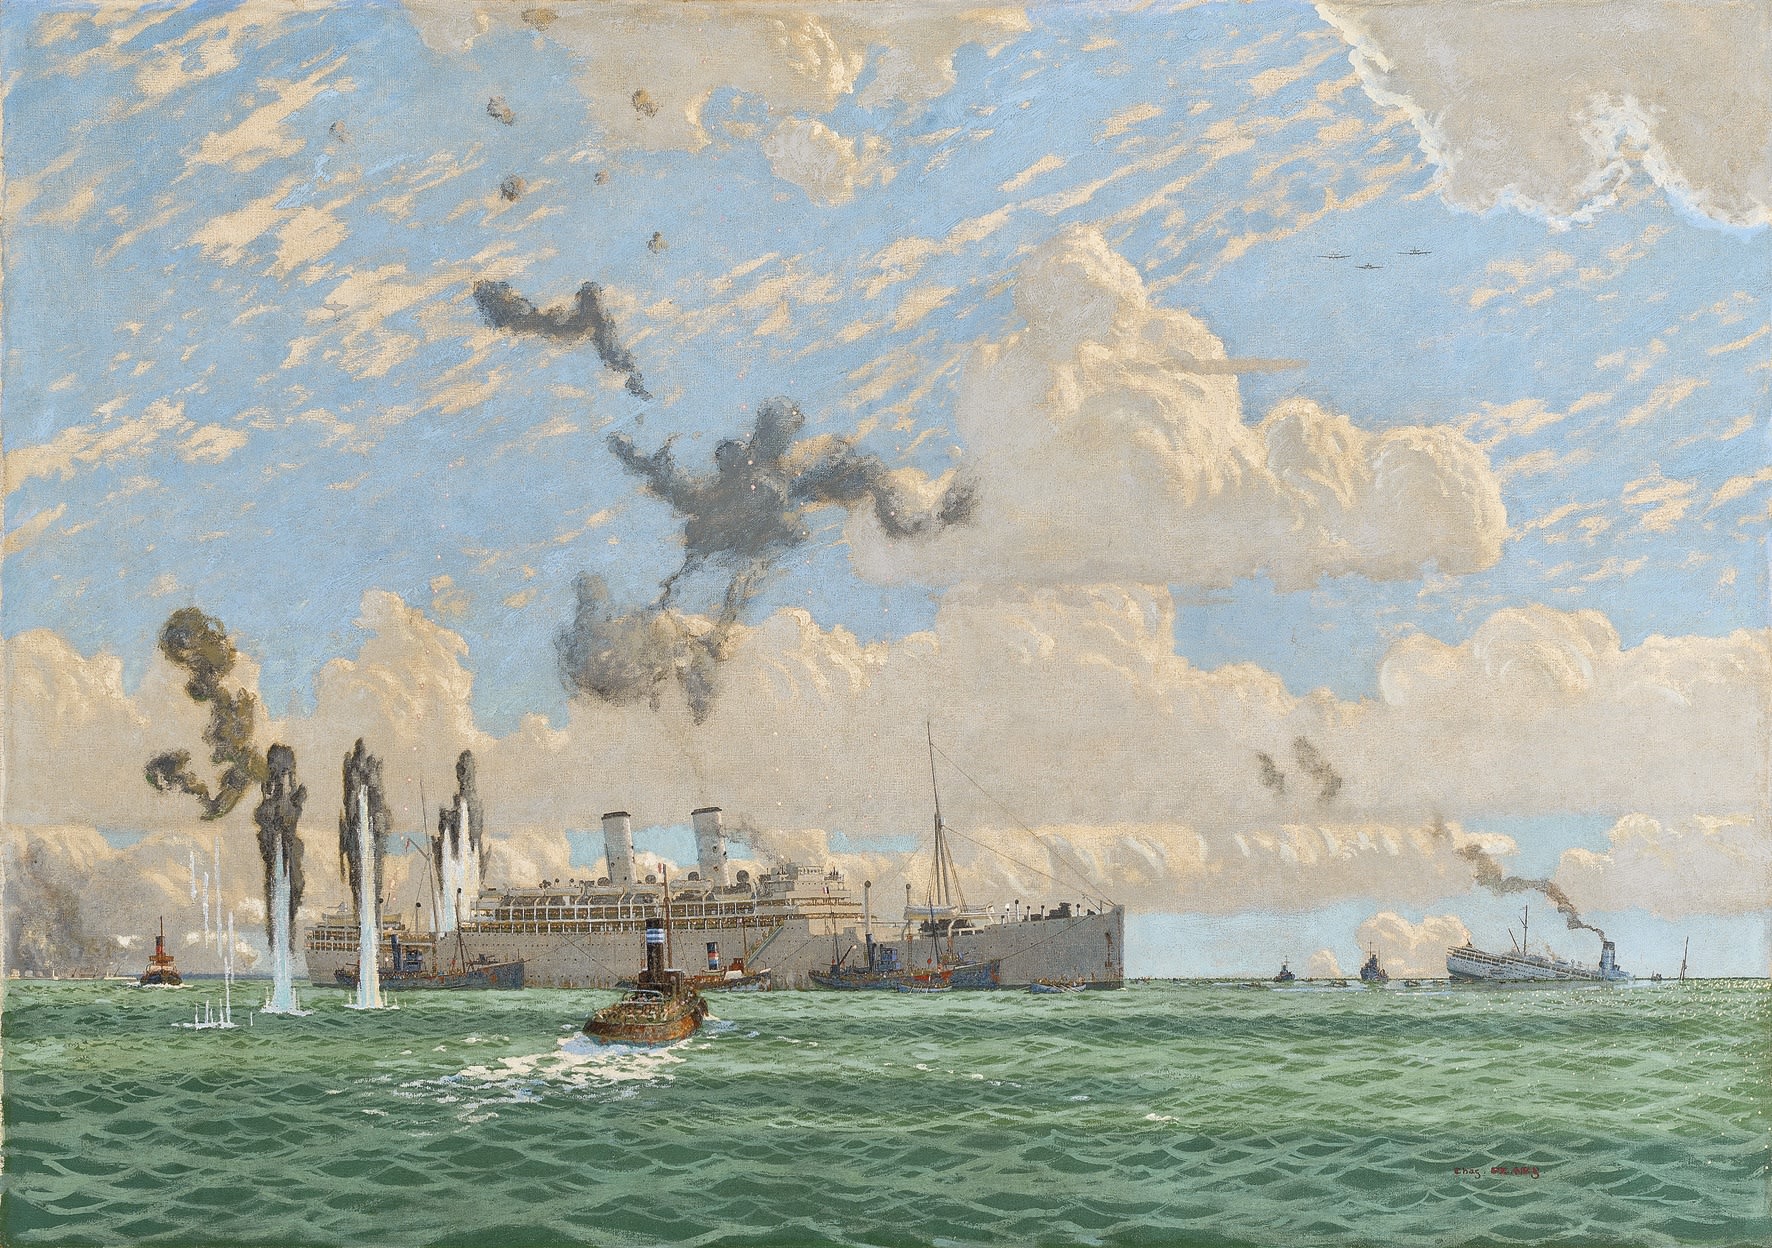
Departing Tilbury on 26th 1939, she was eight days out and into the Mediterranean when War was declared on 3rd September, the immediate result of which was that she was well clear of Suez before her captain once again allowed any visible lights after dark. After returning home in early December, she made only one more round-trip before being requisitioned as a troop transport on 6th April 1940. Modified to carry an additional 1,274 persons, she was first involved in evacuating troops after the disastrous campaign in Norway and finally returned to Gourock, on the Clyde, on 12th June 1940. Two days later, in company with her sister Otranto and another Orient liner, the Ormonde, she sailed for St. Nazaire, on the Atlantic coast of France, to assist with the evacuation of Allied troops in danger of being trapped by rapidly advancing German forces. Oronsay arrived at St. Nazaire early on 17th June and began embarking troops immediately; several hours later, at 1.48pm, she (and the other ships standing off the port) came under heavy air attack during which she was hit several times, including a direct hit on her chartroom which not only destroyed everything in it, but all her internal communication equipment, as well as her radio.
Not so fortunate was another transport, the Cunard liner Lancastria, lying nearby and also embarking troops in large numbers. Just as she was about to weigh anchor in the Charpentier Roads, she too came under attack from German bombers. During the third wave, she was hit by a string of four bombs, one of which penetrated the engine room and caused a massive explosion. An immediate list allowed the launching of only two lifeboats and, after about twenty minutes, the doomed vessel rolled over and sank. Approximately 2,500 men were rescued by small craft and many of them were transferred into Oronsay before she departed the scene. The actual death toll on the Lancastria has never been confirmed however, and whilst a minimum of 3,000 seems certain, it has been suggested that it could even have been as high as 6,500. Ruthlessly censored at the time, the full horror of the incident was not revealed until well after the end of the War and whatever the total number of deaths, it was and remains the worst maritime disaster in British history.
As for the Oronsay, her master, Captain Nicholls, somehow got her back to Plymouth safely "with the aid of a French motoring map and a penny ruler" as he had no navigational instruments or charts, all of which had been lost in her wrecked chartroom. After repairs, she then resumed her wartime duties but was torpedoed and sunk by the Italian submarine Archimede off West Africa on 9th October 1942. Fortunately running empty on that occasion, most of her crew were saved and only five lives were lost.
This superbly atmospheric painting, and one of the very few images in existence of the sinking Lancastria, depicts an incident within the wider operations lasting from 10th - 25th June 1940 which, whilst greatly overshadowed by the epic evacuation of troops from the beaches at Dunkirk, was nevertheless hugely significant in itself and saved just over 215,000 servicemen and civilians from German imprisonment.
Charles Pears established himself illustrating for periodicals before becoming a prolific poster artist during the inter-war period, which included working with London Underground, the Empire Marketing Board and various rail companies. A keen yachtsman, the sea inspired much of his output and eventually led him to become the first President of the (Royal) Society of Marine Artists in 1939. His vast knowledge of ships and high degree of technical precision made him an ideal appointment as a war artist with the government seeking accurate records during wartime. In the First World War he held a commission in the Royal Marines and was an official war artist to the Admiralty, before working for the War Artists' Commission during the Second World War. Examples from these periods seldom appear on the market as the majority are part of the Imperial War Museum and National Maritime Museum collections. Typical of all Charles Pears works, 'The Evacuation from St. Nazaire' combines the unique stylised charm and meticulous detail he is renowned for. The scene successfully captures the drama and tension of the event, as the viewer is placed as if in a boat edging closer to the action. Owing to the government's decision not to publicise the event and Pears' official role at the time, this is certainly an extremely rare and important historical document of a major event at the start of the Second World War.